- Step 1: Check your display's compatibility with Windows 10
- Step 2: Install the necessary drivers
- Step 3: Connect your wireless display to Wi-Fi
- Step 4: Set up a connection between your computer and display
- Step 5: Adjust Display Settings in Windows 10
- Step 6: Troubleshooting Wireless Display Connection Problems
Step 1: Check your display's compatibility with Windows 10
Before you start connecting a wireless display to your Windows 10 computer, it is important to make sure that your display is compatible with this operating system. To do this, you need to check if your display supports Miracast technology. This technology allows you to transmit the image from your device's screen to a wireless display. If your display does not support Miracast technology, then you can use alternative connection methods, such as an HDMI cable or purchase a special adapter for wireless connection. Also, make sure that your computer has wireless support for Wi-Fi and Bluetooth, since you need to use one of these technologies to connect a wireless display. Once you have checked the compatibility of your display with Windows 10, you are ready for the next step - connecting a wireless display to your computer.
Step 2: Install the necessary drivers
Before you can start connecting your wireless display, you need to install drivers on your computer. To do this, follow these steps:
1. Open the Start menu and select Settings.
2. Find the 'Devices' section and select 'Displays'.
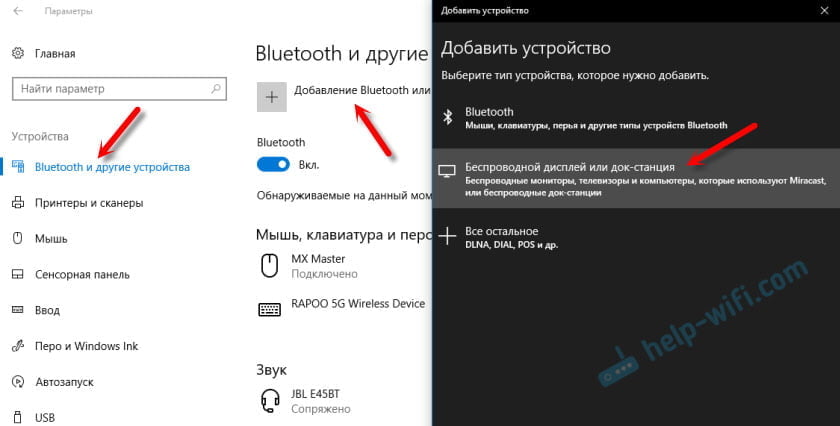
3. Click on the 'Add Bluetooth or other device' button.
4. Select 'Wireless Display' and follow the onscreen instructions.
5. Drivers will be installed automatically if your computer supports Plug and Play. Otherwise, you will have to download the drivers manually from your wireless display manufacturer's website.
Installing the drivers may take some time, but is an important step before connecting your wireless display. Without correctly installed drivers, your computer will not be able to recognize the device and connect it to the system.
We hope that this instruction helped you install the necessary drivers to connect a wireless display in Windows 10. In the next step, we will tell you how to connect the device to your computer.
Step 3: Connect your wireless display to Wi-Fi
Once you've set up your wireless display and connected it to your computer, you need to connect it to Wi-Fi to access the Internet and other network resources.
- Open the Start menu and select Settings.
- Go to the 'Network and Internet' section.
- Select 'Wi-Fi' and make sure Wi-Fi is turned on on your computer.
- Select your wireless display from the list of available Wi-Fi networks and click 'Connect'.
- Enter your Wi-Fi password if required and click 'Connect'.
Once the wireless display is connected to Wi-Fi, you can use it to watch online content, download files, and more.
Step 4: Set up a connection between your computer and display
Once you have installed the drivers for your wireless display, you need to set up a connection between it and your computer. To do this, follow these steps:
1. Enter the key combination Win + P on your keyboard. This will open the display mode selection menu.
2. Select 'Extend' or 'Duplicate' mode, depending on how you want to use your display.
3. If you selected the 'Extend' mode, drag the application window onto your wireless display.
4. If you select 'Duplicate' mode, your computer and wireless display will display the same image.
5. If your wireless display won't connect to your computer, make sure it's within Wi-Fi range and that Wi-Fi is turned on on your computer.
You have now successfully connected your wireless display to your computer. Enjoy improved image quality and ease of use!
Step 5: Adjust Display Settings in Windows 10
Once you have successfully connected your wireless display to your Windows 10 computer, you may need to configure your display settings. To do this, you need to go to the screen settings.
1. Right-click on an empty space on your desktop and select 'Display Settings'.
2. From the Display Settings menu, select the display you want if you have multiple displays connected.
3. Adjust screen resolution and scaling to suit your needs. You can change the zoom to increase or decrease the size of all elements on the screen.
4. Select the screen orientation if you are using a rotating screen.
5. Adjust screen colors and brightness to get the best results.
6. If you have additional display options, such as setting the screen refresh rate, select the appropriate option and configure it.
Once you've configured your display settings, save your changes and enjoy your wireless display in Windows 10.
Step 6: Troubleshooting Wireless Display Connection Problems
When connecting a wireless display in Windows 10, you may experience some problems, such as low data transfer speed or no connection. In this case, you need to check your wireless display settings and make sure it is in connection mode.
If the problem is not resolved, try restarting your computer and wireless display. Also, check your wireless network settings to make sure it is connected to the Internet and has access to your computer.
If you still can't connect your wireless display, try consulting your device's user manual. Some wireless displays have their own programs that can help you resolve connection issues.
Finally, if all else fails, try using a different wireless display or seek professional help.
By following these tips, you can successfully connect your wireless display on Windows 10 and start enjoying content on the big screen.
Read further:


