Step 1. Connecting the TP-Link router to the Rostelecom network The first step when setting up a TP-Link router for Rostelecom is connecting it to the Internet. To do this, you will need an Ethernet cable, which you need to insert into the WAN port on the back of the device and connect the other end to the Rostelecom modem.
After connecting the router to the Internet, you need to turn it on and wait until the indicators on the front panel stop blinking and light up continuously. This may take a few minutes.
If you have connection problems, check that all cables are properly inserted and working properly. Also make sure that the Rostelecom modem is configured to work with the router, and if not, then make the appropriate settings.
After connecting the router to the Internet and setting it up, you can set up a wireless network and connect all your devices to it. To do this, follow the instructions that you will find in our article on setting up a TP-Link router for Rostelecom.
- How to find the IP address of a TP-Link router
- How to enter the settings of a TP-Link router
- Step 3. Setting up an Internet connection on the TP-Link router
- How to choose the type of Internet connection
- How to set up PPPoE on a TP-Link router for Rostelecom
- Step 4. Setting up Wi-Fi on a TP-Link router
- How to change Wi-Fi name and password on a TP-Link router
- How to set up Wi-Fi security on a TP-Link router
How to find the IP address of a TP-Link router
Before setting up a TP-Link router for Rostelecom, you need to find the IP address of the router. There are several ways to do this.
1. The router box must indicate its IP address. If you haven’t saved the packaging, you can try to find it on the manufacturer’s website.
2. If you have already connected a router, you can find its IP address in the settings of your computer or mobile device. To do this, you need to go to the network connections section and find information about connecting to the router. The router's IP address will be indicated in the 'Default Gateway' line.
3. You can also use the command line. To do this, open the 'Command Prompt' on your computer and enter the 'ipconfig' command. The command output will show the router's IP address.
The found IP address of the TP-Link router must be used to enter the router settings and configure the Internet connection.
How to enter the settings of a TP-Link router
In order to set up a TP-Link router for Rostelecom, you need to know how to enter its settings. It's quite simple and will only take you a couple of minutes.
Step 1: Connect your computer to your TP-Link router using an Ethernet cable.
Step 2: Open your web browser and enter your router's IP address into the address bar. Usually it's 192.
168.0.1 or 192.168.1.1. If you don't know your router's IP address, you can find it on the back of your router or in its documentation.
Step 3: Enter your administrator username and password. If you have not changed it before, the default login and password are admin.
Step 4: You will be taken to the TP-Link router settings. Here you can configure all the settings necessary to connect to the Internet.
Now you know how to enter the settings of your TP-Link router. The following are detailed instructions for setting up a router for Rostelecom.
Step 3. Setting up an Internet connection on the TP-Link router
After successfully connecting the router to a power source and setting up the local network, you need to configure the Internet connection. To do this, follow these steps:
1. Go to the router settings by typing the router’s IP address in the browser address bar. This is usually 192.168.0.1 or 192.168.1.
1. Enter the username and password that you specified when setting up the local network.
2. In the settings menu, select the 'Internet' section. Select the connection type provided by your ISP. If you are connected to Rostelecom, then select 'PPPoE'.
3. Enter the username and password that you received from your provider. They are usually specified in the contract for the provision of Internet service provider services. Click the 'Save' button.
4. If your provider uses a static IP address, then enter it in the appropriate fields. If your provider uses a dynamic IP address, then leave the fields blank.
5. Click the 'Save' button and reboot the router.
After completing these steps, your TP-Link router should successfully connect to the Internet. If you have any problems during setup, please refer to the instructions that came with the router or contact your provider's technical support.
How to choose the type of Internet connection
When choosing the type of Internet connection, there are several factors to consider. First of all, it is the speed and stability of the connection. If you need high-speed Internet, then connecting via fiber optic cable is the best choice. However, not all providers provide such a service.
If fiber optic cable is not available, you can choose to connect via a DSL modem. This connection is based on the use of an existing telephone line and allows you to get high Internet speeds. However, it is necessary to take into account that the further you are from the central station, the slower your connection speed will be.
Another option is to connect via cable TV. This connection also allows you to get high Internet speed, however, the stability of the connection may be disrupted during TV installation.
Finally, you can choose to connect via a wireless network. This connection is based on the use of Wi-Fi technology and allows you to connect to the Internet through special access points. However, Internet speed may be slower than using other connection types.
Thus, when choosing the type of Internet connection, you need to consider the speed and stability of the connection, as well as the availability of available technologies in your area.
How to set up PPPoE on a TP-Link router for Rostelecom
To configure a TP-Link router to use an Internet connection from Rostelecom via the PPPoE protocol, you must complete the following steps:
1. Connect the router to your computer using an Ethernet cable and turn it on.
2. Open your browser and enter your router's IP address in the address bar. Typically it is 192.168.0.1 or 192.168.1.1 (if you haven't changed it before). Press Enter.
3. Enter your username and password to log into the router control panel. If you have not changed them before, they should be indicated in the documentation for the router. Click Login.
4. Find the Network section on the main page of the control panel and select WAN.
5. Select the PPPoE connection type and enter your Rostelecom account information (login and password). Click Save.
6. Reboot your router to apply the settings.
Now your router is configured to connect to the Internet via Rostelecom using the PPPoE protocol. If you have connection problems, try rebooting your router and checking the settings again.
Step 4. Setting up Wi-Fi on a TP-Link router
Once we have successfully set up an Internet connection through the TP-Link router, we can begin setting up a wireless Wi-Fi network. To do this, you need to log into the router’s web interface using the address 192.168.0.1 and the default login/password admin/admin.
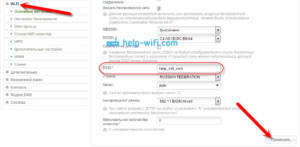
Next, select the 'Wireless' tab in the top menu and go to the 'Wireless Settings' tab. Here you can configure your wireless network name (SSID) and password to secure access. It is recommended to use WPA2-PSK as the encryption type as it is the most secure way to secure Wi-Fi.
You can also configure other parameters such as channel and operating mode. It is recommended to select automatic channel and 802 mode.
11n to get maximum speed and signal stability.
After setting up Wi-Fi, save the changes and restart the router. You can now connect to your wireless network using the name (SSID) and password you specified in settings.
How to change Wi-Fi name and password on a TP-Link router
If you want to change the Wi-Fi name or password on your TP-Link router, follow the simple instructions.
1. Connect your computer to your TP-Link router using an Ethernet cable.
2. Open your browser and enter the address 192.168.0.1 into the address bar. Enter your username and password to access the router settings.
3. Go to the 'Wireless' section and select 'Wireless Settings'.
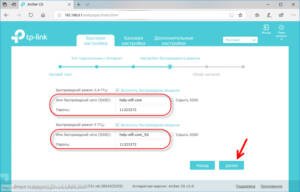
4. In the 'Wireless Network Name' field, enter a new name for your Wi-Fi network.
5. In the 'Wireless Password' field, enter a new password for your Wi-Fi network.
6. Click 'Save' to save the changes.
7. Reboot your TP-Link router for the changes to take effect.
Now you know how to change the Wi-Fi name and password on a TP-Link router. It's very simple and will only take you a few minutes. Don't forget to save the changes and reboot your router for the new settings to take effect.
How to set up Wi-Fi security on a TP-Link router
When you set up a TP-Link router for use with Rostelecom, one of the most important aspects is setting up Wi-Fi security. This will keep your home network secure and prevent unauthorized access to your Internet connection.
First, you need to log into the router control panel using your username and password. Then select the "Wireless" tab to configure your wireless network settings.
The first step is to change the Wi-Fi network name and password. Select the "Wireless Settings" option and enter the new network name and password in the appropriate fields. Use a complex password that consists of letters, numbers, and symbols to prevent unauthorized access.
Next, select the “Wireless Security” option to configure the type of security for your wireless network. We recommend using WPA2-PSK, which provides the highest level of security. Enter a password to protect your network and save the settings.
If you want to prevent certain devices from accessing your Wi-Fi network, you can use the MAC Filter feature. Select the Wireless MAC Filtering option and enter the MAC addresses of the devices you want to allow or block from connecting to your network.
Finally, you can enable the Guest Network feature, which creates a separate network for guests to connect to your router. Select the "Guest Network" option and configure the settings, including the network name and password.
Setting up Wi-Fi security on your TP-Link router won't take much time, but will provide additional security for your home network. Follow these instructions and set up Wi-Fi security on your TP-Link router for use with Rostelecom.
Read further:


