Step 1: Connect to the Internet
Before you start using the Internet on your PC, you need to properly configure its network connection. To do this you need to follow these steps:
- Connect the network cable to your PC's network card and modem or router.
- Check that the link light on the network card is on.
- Open the Start menu and select Control Panel.
- Select 'Network & Internet' -> 'Network Connections'.
- Right-click on the network connection icon and select 'Properties'.
- Select 'Internet Protocol Version 4 (TCP/IPv4)' and click the 'Properties' button.
- Set the IP address and DNS server values provided by your ISP.
- Click 'OK' and close all windows.
- Test your connection by opening any browser and going to any website.
By following these simple instructions, you can set up an Internet connection on your PC and start enjoying all the benefits of the online world.
How to connect PC to Wi-Fi?
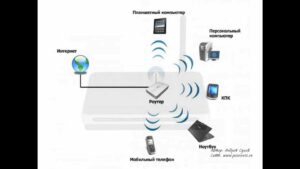
If you have a computer, but no wired Internet, then you can connect it to Wi-Fi. It's very easy to do if you follow a few simple steps.
1. Make sure your computer has a Wi-Fi adapter. If not, you can purchase one from an electronics store.
2. Tap the Wi-Fi icon in the bottom right corner of the screen.
3. Select the Wi-Fi network you want to connect to.
4. Enter the Wi-Fi network password, if you have one.
5. Wait a few seconds for the computer to connect to the network.
6. Done! Your computer is now connected to Wi-Fi and ready to use.
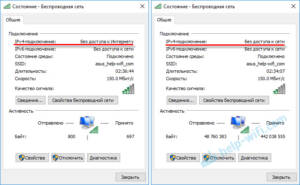
Don't forget that you can also configure your Wi-Fi connection using different settings such as IPv4 or DNS servers. This will help improve the speed and stability of your Internet connection.
How to change IP address on PC?
Sometimes you may need to change the IP address on your computer. This may be due to problems accessing certain sites or network settings. In this article we will look at how to change the IP address on a PC.
1. Open 'Control Panel' and select 'Network and Internet'.
2. Select 'Network Connections' and find the appropriate connection.
3. Right-click on the selected connection and select 'Properties'.
4. Select 'Internet Protocol Version 4 (TCP/IPv4)' and click 'Properties'.
5. Select 'Use the following IP address' and enter the new IP address, subnet mask and default gateway.
6. Click 'OK' to save the settings.
Your computer will now use the new IP address. Remember that changing the IP address can cause network problems, so do this only if necessary and with caution.
How to set up a DNS server on a PC?
Setting up a DNS server on your PC can help speed up access to websites and improve online security. First you need to select the DNS server that will be used. You can use the standard DNS server provided by your ISP, or you can choose a different DNS server, such as Google Public DNS or OpenDNS.
To set up a DNS server on your PC, you need to open the control panel and select the 'Network and Internet' section. Then select 'Network Connections' and find the appropriate connection. Right-click and select 'Properties'.
Select 'Internet Protocol Version 4 (TCP/IPv4)' and click 'Properties'. Under 'General', select 'Use the following DNS server addresses' and enter the DNS server IP address. Click 'OK' and close all windows.
After this, restart your computer for the changes to take effect. The DNS server is now configured on the PC and should work correctly.
Do not forget that changing the DNS server can affect the operation of the Internet and applications, so before changing the DNS server, it is recommended that you read the instructions of your provider and make a backup copy of important data.
How to set up a proxy server on PC?
A proxy server is software that allows you to redirect Internet requests through another server. This can be useful if you want to hide your IP address, bypass blocked sites, or improve the speed of your Internet connection.
To set up a proxy server on your PC, you need to follow a few simple steps:
1. Open the Internet connection settings on your PC.
2. Find the “Proxy Server” section and select the “Use a proxy server” option.
3. Enter the proxy server address and port that you received from your ISP or network administrator.
4. Click "OK" to save the settings.
If you use a browser, you can set up a proxy server directly in it. For example, in Google Chrome this is done as follows:
1. Open your browser settings and select Advanced Settings.
2. Find the “Network” section and select “Change proxy settings.”
3. Enter the proxy server address and port.
4. Click "OK" to save the settings.
Now you know how to set up a proxy server on your PC. Please note that using a proxy server may slow down your Internet connection and is not always secure. Therefore, be careful and use a proxy server only when necessary.
Step 3: Check Connection
After you have set up the Internet on your PC, you need to check its connection. To do this, you can use a browser and open any page on the Internet. If the page loaded quickly and without problems, then the connection is working correctly.
However, if you are having connection problems, you need to check the following settings:
1. Check that the settings entered in the appropriate fields are correct.
2. Make sure all cables are connected correctly and securely.
3. Check your firewall and antivirus software settings. They can block access to the Internet.
4. If you are using a wireless connection, check that you are connected to the correct Wi-Fi network and that the password you entered is correct.
5. Try restarting your router and computer, this may help solve the problem.
If none of the above helps, contact your Internet service provider for assistance. They can test your connection and help you resolve internet issues on your PC.
How to check Internet speed on PC?
In order to find out the Internet speed on your computer, you need to use special online services. There are many sites on the Internet that allow you to test your connection speed.
One of the most popular services for checking Internet speed is Speedtest.
net. In order to conduct the test, you need to go to this site and click on the 'Start' button. The program will then automatically begin testing the speed of downloading and uploading data.
If you need to conduct a test on a local network, you can use the LAN Speed Test program. This program allows you to check the data transfer speed between two computers on a local network.
There are also many other services for checking Internet speed. You can choose any of them and test according to the instructions on the site.
Remember that Internet speed can depend on many factors, including connection quality, connection type, computer specifications, and so on. Therefore, it is recommended to carry out a speed test regularly to ensure that everything is working as normal. Connecting to the Internet on a PC can sometimes cause problems. They can be solved using a few simple steps.
The first step is to check the connection. Make sure the Ethernet or Wi-Fi cable is connected to your computer and modem or router. If the connection is established, check to see if your Internet service has been disabled by your ISP.
If the connection is fine, but the Internet does not work, reboot the equipment. Turn off your modem and router, wait a few minutes, and then turn them on again.
If the problem persists, check your network card settings. Go to 'Control Panel', select 'Network and Internet', then 'Network Connections'. Right-click the appropriate connection and select Properties. Make sure the IP address and DNS server are configured correctly.
If all the above steps do not help, try updating your network card drivers. You can do this by going to your computer manufacturer's website and downloading the latest driver.
By following these simple steps, you can easily fix internet connection problems on your PC.
Read further:


